
Technical Note: Diagnosing ROM Socket Contact Failures on the ROM-inator Resurrections.
- Kay Koba
- Jun 13
- 4 min read
Updated: Jun 16

We have received several inquiries from builders stating that their newly assembled ROM-inator Resurrections fails to boot, even though the assembly appears structurally sound.
In approximately 90% or more of these cases, the root cause is not a defective ROM-inator PCB or a soldering error, but rather a mechanical contact failure inside the vintage ROM socket on the host logic board. It is always disheartening to see posts from builders who feel discouraged when their kits do not boot on the first try. We want to ensure that every builder successfully revives their machine, which is why we are sharing this technical breakdown of the symptoms, the mechanical root cause, and the verification/rectification procedures.
Symptoms of Contact Failure
When a ROM-inator suffers from poor pin connectivity, the behavior is not always a simple black screen. Depending on which address, data, or control lines are floating, you may observe the following symptoms:
Sad Mac, Chimes of Doom: A cracked glass sound (or hardware exception chime) during the POST (Power-On Self-Test). On early Macintosh models, this specific error chime is often triggered during the memory/RAM initialization sequence if the system cannot access the required address space.

Video Artifacts (Checkerboard Patterns): The display shows a checkerboard pattern—the most classic indicator of a ROM malfunction—and occasionally fine horizontal or wide vertical lines. This indicates that the CPU is executing garbage instructions or that the frame buffer has failed to initialize properly.

Partial Functionality (No ROM Disk Boot): The system boots into the standard OS successfully from a SCSI drive or floppy but completely fails to recognize or boot from the ROM disk. This implies that a specific upper-address line or control line dedicated to the ROM disk mapping is open-circuit. If you find yourself in this situation, it's safe to say that you're almost certainly in the right place. This is because if the ROM disk simply won't boot, it means the creation process itself was successful and the ROM is functioning correctly. This is because, considering the entire ROM, the ROM disk is stored in the latter 75% of the ROM, indicating that there's a break somewhere in the address lines in that latter half.

Pressing the R key yields no response!
The Diagnostic Trap: The "Stock ROM" Fallacy
A common oversight during troubleshooting follows this logic:
Stock Apple ROM Installed: System boots successfully.
ROM-inator Installed: System exhibits one of the failure modes above.
While it is statistically logical to suspect the new hardware, this conclusion overlooks the mechanical differences between vintage and modern IC pins.
Mechanical Analysis of the Root Cause
The vintage dual-in-line (DIP) sockets used on legacy Macintosh logic boards utilize leaf-spring contacts designed specifically for flat, stamped IC legs.
Over decades of thermal cycling and mechanical stress from the original ROM, these leaf springs deform permanently, losing their elasticity. The ROM-inator utilizes modern, solid turned machine pins (round pins). When inserted into a fatigued vintage socket, the weakened leaf springs often fail to spring back far enough to make electrical contact with the round profile of the machine pins, leaving multiple lines floating.
When the stock ROM is reinserted, its wider, flat legs manage to bridge the gap and make contact with the deformed springs, creating the illusion that the socket is perfectly fine.
Corrective Actions & Repair Protocol
If you isolate the issue to socket fatigue, apply the following hardware rectification steps in order of complexity:
Option A: Contact Conditioning & Reseat (Non-Destructive)
In the majority of cases, the socket can be recovered by cleaning and mechanically cycling the contacts.

Targeted Deoxidization: Apply a high-quality contact cleaner/deoxidizer (e.g., DeoxIT D5) directly into the socket pin receptacles. Pro Tip: Instead of spraying directly onto the logic board, spray a small amount into a glass container, saturate a cotton swab with the fluid, and carefully apply it to the socket contacts to avoid overspray.
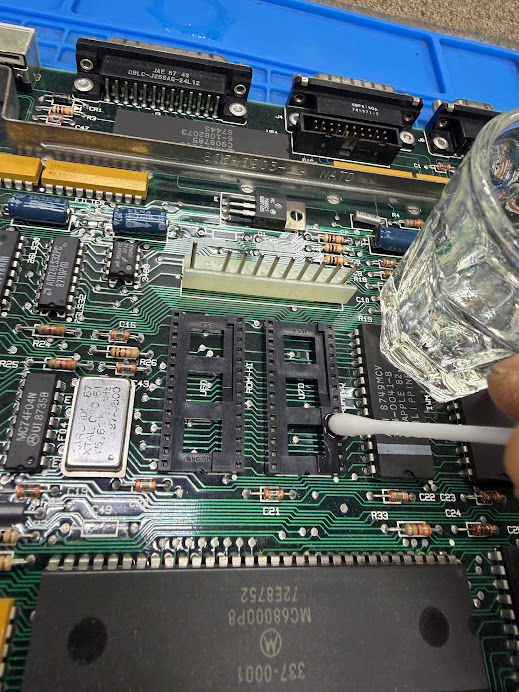
Mechanical Cleaning: Use a fine needle, dental pick, or a stiff wire to gently actuate and clear any localized oxidation inside each individual pin slot. Pro Tip: A piece of a plain (unwound) 2nd or 3rd string from an electric guitar works exceptionally well for this task.

Contact Burnishing: Perform multiple insertion/extraction cycles with the ROM-inator to allow the machine pins to burnish the internal socket contacts. For a real-world demonstration of this troubleshooting process, Macintosh YouTuber David Stahl (Aka, Dave's Vintage Apple Tech) ran into this exact issue and successfully resolved it using these methods. You can watch his troubleshooting video here: https://www.youtube.com/watch?v=57Qp7j2Fg4o
Option B: Socket Replacement (Definitive Fix)
If the internal leaf springs are severely fatigued or suffer from structural tension loss, full remediation requires desoldering the vintage socket and installing a high-quality, dual-wipe or machine-tool DIP socket.
Conclusion
The ROM-inator kit is a mathematically verified design with high manufacturing tolerances. If your build is experiencing erratic boot behavior, do not abandon the project. Treating the logic board's ROM socket as a wear item and addressing the contact integrity will resolve the issue in nearly all instances.
Reference Links:


Comments